Create your own project, pattern, component and files generator: Yeoman vs Plop

Yeoman is a scaffolding tool that helps you kickstart your new projects by providing a generator ecosystem that can be launched with the command yo.
It is most commonly used to generate entire projects, but can also generate any kind of files.
Installation
- Node.js (with npm included) is required. You can download the latest version from the following link.
- From the command line, run
npm install -g yo generator-generator
Getting started
Run the yo generator command at the folder where you want to generate the generator project. You will be prompted to input the generator name and other details.
The directory tree of the generator project will look like this:
├── package.json
├── README.md
├── .editorconfig
├── .gitattributes
├── .gitignore
├── .eslintignore
├── .travis.yml
├── LICENSE
├── generators/
│   └── app/
│       ├── index.js
│       └── templates/
│           └── dummyfile.txt
└── __tests__/
    └── app.js
The generators\app\index.js file is the main entry of the generator.
Replace the contents of generators\app\templates with the project you want to generate. For example, copy (or make a symbolic link with ln or mklink) the folder containing the code to generators\app\templates\project-template
Here is an example with a basic user interaction:
"use strict";
const Generator = require("yeoman-generator");

module.exports = class extends Generator {
  constructor(args, opts) {
    super(args, opts);
    this.description = "Project starter description";
  }

  prompting() {
    const prompts = [
      {
        type: "input",
        name: "projectFolder",
        message: "Project folder location",
        default: "my-project",
      },
    ];

    return this.prompt(prompts).then((props) => {
      // To access props later use this.props.someAnswer;
      this.props = props;
    });
  }

  writing() {
    this.fs.copy(
      this.templatePath("project-template"),
      this.destinationPath(this.props.projectFolder)
    );
  }
};
Prompts
You can use prompts for user interaction. The different possibilities of prompts are described here, the most common one would be input.
You can save some prompt answers to be set as a default value by using the store property set to true. More details about user interactions in Yeoman available here.
Templating
To insert variables inside files, the this.fs.copyTpl method can be used. It supports the ejs templating system.
For example, the project name can be inserted inside a template file with: <%= name %>.
{
  "name": "<%= name %>",
  "version": "1.0.0"
  // ...
}
Share the project
To be able to launch this generator from any working directory of your computer, run npm link from the root of the generator project
You can also publish this module to a npm registry so that it can be used by other users.
You can now test your generator from any directory using the command yo your-generator-name (without the generator- prefix).
Generating a project with Yeoman
Install the generator, or use the generator linked using npm link.
As an example, we can install the vscode extension generator:
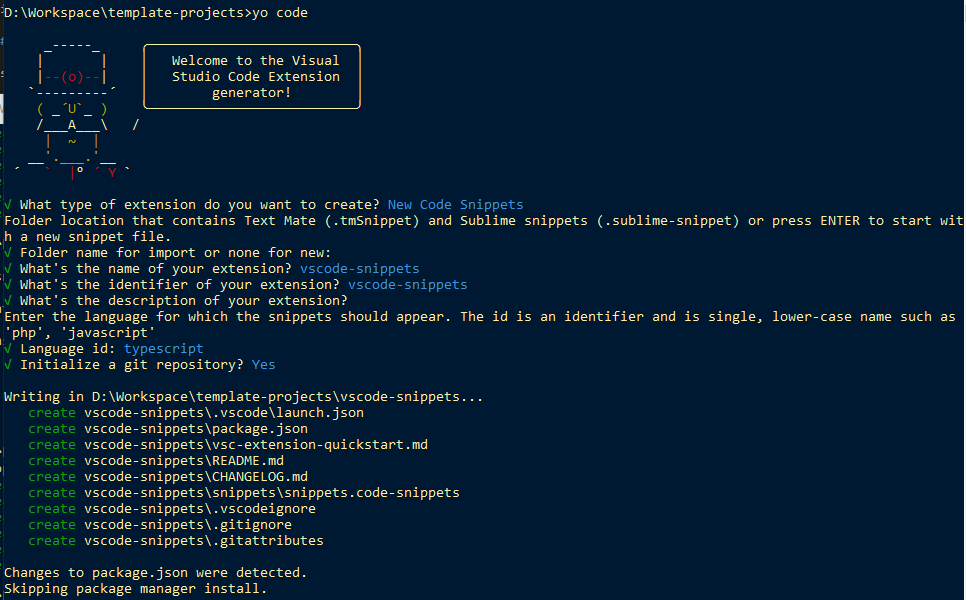
npm install -g generator-codeOpen a command prompt from the folder where you want to generate the vscode extension, and run: yo code

References and resources
- https://yeoman.io/authoring/
- https://yeoman.io/authoring/user-interactions
- https://yeoman.github.io/generator/Generator.html
- More generator projects can be found here: https://yeoman.io/generators/ (you can search the source code using npm search), for example:
Plop.js is described as a "micro-generator framework". It's better suited to generate smaller parts of existing projects or any kind of text files in a consistent way. It provides a generator ecosystem based on Inquirer.js prompts and Handlebar.js templates.
Contrary to Yeoman, it can't be used to generate entire projects. In return, it has more adapted features to generate or modify files inside existing projects.
Installation
- Node.js (with npm included) is required. You can download the latest version from the following link.
- From the command line, run
npm install -g plop - (Optional) If you have a Node.js project, plop can be saved as a dev dependency by running the following command in the root directory of the project
npm install --save-dev plop
Getting started
In this example, we will be generating controller classes for a Java Spring Boot web application (make sure to select Spring Web as a dependency when initializing the project using https://start.spring.io/)
The source code will be provided at the end.
Prompts and actions definition using plopfile.js
Add a plopfile.js file to the root of the application with the following content:
export default function (plop) {
  plop.setGenerator("controller", {
    description: "Spring Boot Rest Controller",
    prompts: [
      {
        type: "input",
        name: "name",
        message: "Controller name",
      },
    ],
    actions: [
      {
        type: "add",
        path: "src/main/java/com/example/webapp/controller/{{pascalCase name}}Controller.java",
        templateFile: "plop-templates/controller.hbs",
      },
    ],
  });
}
The different possibilities of prompts are described here, the most common one would be input.
The actions array holds the actions that the generator will execute to add and modify files to your project. The built-in actions and their formats are detailed here. The directories will automatically be created if they don't exist.
Templating
All the variables collected from the prompts are made available by Plop.js to be used in template expressions. The syntax of these templates is based on Handlebar.js.
Let's create a plop-templates folder at the root of the project to hold the templates that will be used by the plop generator, and a controller.hbs file inside it with the following content:
package com.example.webapp.controller;

import org.springframework.web.bind.annotation.RestController;
import org.springframework.web.bind.annotation.RequestMapping;

@RestController
public class {{pascalCase name}}Controller {

    @RequestMapping("/{{dashCase name}}")
    public String index() {
        return "{{pascalCase name}}Controller works!";
    }

}
Some helper functions were used for string formatting (such as pascalCase and dashCase).
More built-in helpers can be found here.
Organizing Plop configuration
The previous example can be refactored to make the controller generator available to any project.
Create a directory that will hold all your generators implementation (either inside the previous example or as a standalone workspace): <plop-workspace-path> that may be ./plop
Create a package.json file in this directory with the following contents (you can change plop-package-name with a custom name if you're going to share it):
<plop-workspace-path>/package.json
{
  "name": "plop-package-name",
  "version": "1.0.0",
  "main": "plopfile.js",
  "type": "module"
}
Then move the plopfile.js file and plop-templates folder from the previous example to <plop-workspace-path>.
An update is necessary to correctly resolve the templates path:
<plop-workspace-path>/plopfile.js
import path from "node:path";

import { fileURLToPath } from "url";

const __filename = fileURLToPath(import.meta.url);
const __dirname = path.dirname(__filename);

const templatesPath = path.resolve(__dirname, "plop-templates");

export default function (plop, config) {
  const packageName = config && config.package;
  const packagePath = packageName ? packageName.replace(/\./g, "/") + "/" : "";
  plop.setGenerator("controller", {
    description: "Spring Boot Rest Controller",
    prompts: [
      {
        type: "input",
        name: "name",
        message: "Controller name",
      },
    ],
    actions: [
      {
        type: "add",
        path: `src/main/java/${packagePath}controller/{{pascalCase name}}Controller.java`,
        templateFile: `${templatesPath}/controller.hbs`,
        data: {
          packageName,
        },
      },
    ],
  });
}
<plop-workspace-path>/plop-templates/controller.hbs
package {{packageName}}.controller;
// ...
A custom configuration was introduced from the project specific plopfile.js.
This configuration provided the packageName variable, without user input, and was used inside controller.hbs in a template expression.
Using Plop without sharing
The following plopfile.js file must be be created in the root directory of the projects where you want to use the generators:
import templatePlop from "<plop-workspace-path>/plopfile.js";
export default function (plop) {
  templatePlop(plop, { package: "your.app.package" });
}
Sharing Plop generators
You can also use npm link or install the module from an npm registry (if already published)
import templatePlop from "plop-package-name";
export default function (plop) {
  templatePlop(plop, { package: "your.app.package" });
}
Using npm link
npm link requires 2 commands: npm link from <plop-workspace-path>, and npm link plop-package-name in the project folder where you want to use the generators
Generating a project file with Plop
To generate a new controller in the project using user input, run plop controller or plop controller <controller-name>

References and resources
- https://www.npmjs.com/package/plop
- https://plopjs.com/documentation/
- https://www.npmjs.com/package/@inquirer/prompts
- https://handlebarsjs.com/guide/expressions.html
Source code available at Github.